One of the first things that I modeled for 3D printing was a platform canopy. I realised that it would be relatively simple to produce a mix and match system that would allow you to make up canopies from a series of components. Basically a system of columns, trusses and roof panels. From my Shapeways store,
https://www.shapeways.com/shops/modelrail
You can purchase, individual components, columns, trusses etc, to assemble your own canopies. You may only want to buy trusses, using your own scratchbuilt columns and roofs. You may want to buy just the columns, are you may want to buy a complete section of platform canopy, with it’s columns trusses and roof panels, all printed as a single 3D object. All options are catered for. It might just be that you want to buy the valancing, that is again offered as a stand alone option.
While the components have been available for some time, I’ve been very slow to add documentation that makes it clear what the sizes of these components are, and how the whole thing goes together. To make things easier, I’m now preparing dimensioned drawings of the components, that show the size of the components when printed in OO scale and N scale, as well as the size that the object would be in real life 12″ to the foot. The first of these is now available in PDF form to download. Just click on the the thumbnail below, which will open the PDF drawing in a new Tab.
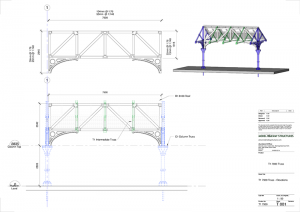
The component illustrated is the T1 7900 Truss. T1 represents Truss Type 1 and the 7900 identifies that the full size length of this truss would be 7900mm. Of course the model size depends on what scale the model is printed at. The T1 Truss is a spine truss that spans from column to column. It’s shown on the drawing spanning between two C1 Columns. supporting an R1 roof.
Truss Type 1, will fit with a Column Type 1 which will support a Roof type 1. In this case it is a 7900 long Truss so it is being used with an 8100 roof. The roof is 200mm longer than the truss to allow it to lap onto the supporting column at each end.
I will be adding drawings to the website of all components to make it easier for modelers to plan these into their own scratchbuilt structures.
Coming next will be a drawing explaining the sizing of sash windows available for Scalescenes models.